2018-01-23

Make a copy of saved files to another directory


For various reasons I needed to sync files between one folder to another as soon as a certain file was saved in the first folder. I was wondering if Emacs could do this for me, and of course it could :)

Basically, what I am using below is Emacs' `after-save-hook' together with a list of regular expressions matching files to be "synced" and the target folder to copy the files to. Each time I save a file, the list of regexps will be checked and if there is a match, the file will also be copied to the defined target directory. Neat!

It works very well so I thought of sharing it in this way. Also, it was a long time since I wrote a blog post here... :)

Put the following code in your .emacs or init.el file and then customize after-save-file-sync-regexps.

Enjoy!

;; The Code

(defcustom after-save-file-sync-regexps nil
  "A list of cons cells consisting of two strings. The `car' of
each cons cell is the regular expression matching the file(s)
that should be copied, and the `cdr' is the target directory."
  :group 'files
  :type '(repeat (cons string string)))

(defcustom after-save-file-sync-ask-if-overwrite nil
  "Ask the user before overwriting the destination file.
When set to a non-`nil' value, the user will be asked. When
`nil', the file will be copied without asking"
  :group 'files
  :type 'boolean)

(defun after-save-file-sync ()
  "Sync the current file if it matches one of the regexps.

This function will match each regexp in
`after-save-file-sync-regexps' against the current file name. If
there is a match, the current file will be copied to the
configured target directory.

If the file already exist target directory, the option
`after-save-file-sync-ask-if-overwrite' will control if the file
should be written automatically or if the user should be
presented with a question.

In theory, the same file can be copied to multiple target
directories, by configuring multiple regexps that match the same
file."

  (dolist (file-regexp after-save-file-sync-regexps)
    (when (string-match (car file-regexp) (buffer-file-name))
      (let ((directory (file-name-as-directory (cdr file-regexp))))
        (copy-file (buffer-file-name) directory (if after-save-file-sync-ask-if-overwrite 1 t))
        (message "Copied file to %s" directory)))))

(add-hook 'after-save-hook 'after-save-file-sync)

;; The End


2016-09-12

barebones.el - the most basic .emacs file I use

Today I decided to write a little bit of documentation for my most basic version of .emacs or init.el that I use. It gets me up to 80% or so of full productivity for basic text editing on a new installation.

It can be found here:

https://github.com/mathiasdahl/dotemacs (download the barebones.el file)

Perhaps someone else will find it useful, as it is or as a simple start for their own Emacs customizations.

Enjoy!

2016-01-04

Making the JD-Xi mobile by replacing the AC adapter with a USB-battery

Intro


Before Christmas I bought myself a gift, namely a Roland JD-Xi synthesizer. It looks like this:


It is my first real synthesizer (I've got some simpler keyboards before) and it's really nice.

The Problem


There is one thing that annoys be however and it is the fact that you cannot power it by batteries (I tend to want to use it in different rooms in our apartment, and I have to carry along the AC adapter all the time). The guy at the store tried to explain to me that this was indeed a real synth ("it's not a toy", kind of thing) and those did not get to be powered by batteries, No Sir. Turns out that there are several smaller synths that can be powered by batteries as well as an AC adapter. Oh well...

A solution?


At Christmas, I got this "USB-battery" (known also as a "powerbank" and many other names):

Looking at the specs of the battery I realized it was very close to what the JD-Xi needed. The AC adapter for the synth delivers around 5.8 V and the manual says the synth uses at most 1000 mA (1 A) of current. The battery spec says it can deliver that, for 5 V (which means the current will be a bit higher since the voltage is lower). I discussed this with a couple of electronically savvy friends and decided I would try and make myself a cable that would take the power from the USB A socket in the battery and "convert" (well...) that to the needed DC plug.

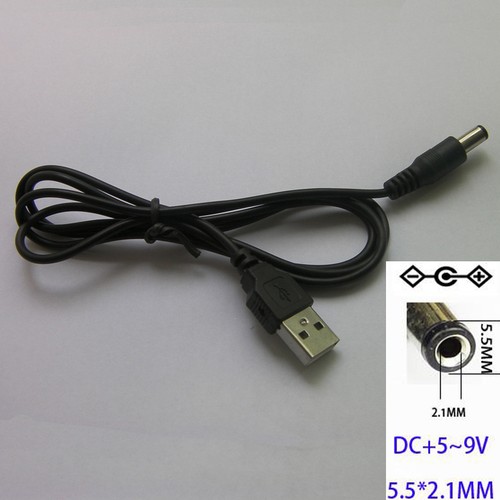
But let's back up a bit... First I thought I should buy one of these things. I searched eBay and found that there is indeed a cable that does almost what I want:


The "only" problem with it is that the poles are wrong on the DC plug side. The adapter from Roland has the + on the outside and - on the inside, but these thingies has it the other way around as you can see above (you can see it at the top of the insert in the image). Since I do not want to fry my new and shiny synth I had to find another solution. So, I found 
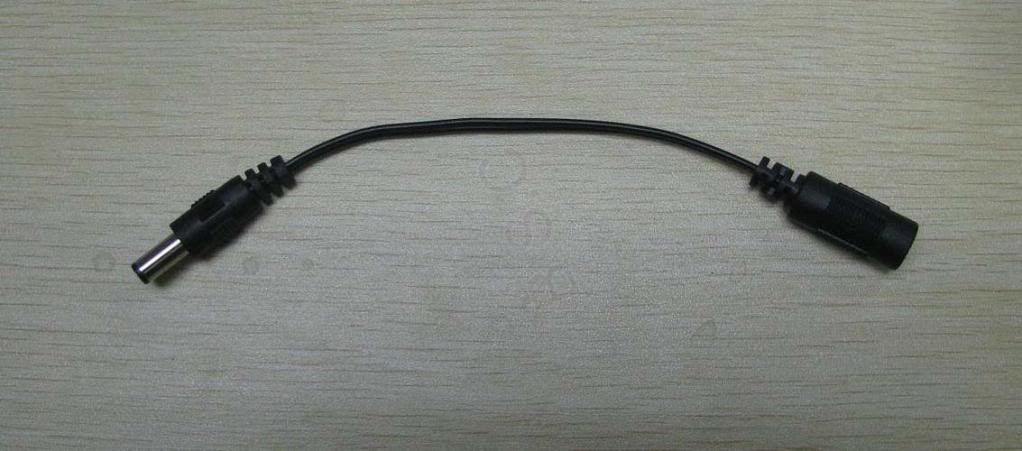
this polarity changer:


Nice!

Now... I could order this from eBay and wait the four weeks it takes for the stuff to arrive to Sweden, or... I could make my own cable! (with no need for the extra polarity changer/switcher). And this is exactly what I did today. By the way, if *you*, on the other hand, are happy with that solution, or even happen to find a USB-cable with the right polarity, perhaps you don't need to continue reading :) For others, read on below...

What you will need


Male DC plug 5.5 x 2.1 mm


On eBay I could not find any auction for buying only one but probably your local electronics store will sell you one like these:

Now, be careful here! It should be 5.5 x 2.1 mm, NOT 5.5 x 2.5. OK? For some reason, and probably because manufacturers want to lock us in to buy their adapters, there is a gazillion (well...) different plug sizes and with different polarities. Make sure you get the correct one.

An old USB cable with at least one USB type A male plug (that we will maim)


Well, it does not have to be old of course, you can buy a new (cheap) one, You could also buy only the male USB A plug and solder a cable onto that, but I found it more convenient to use an existing one. That way, I only needed to solder the cable in one of the ends.

The USB type A male plug is this quite big and flat USB plug that we all know and love:


The pins in this plug are defined like this:


As you can see above, the power is on pin 1 and 4. 2 and 3 carry the signals.

Soldering iron, pliers and a voltage meter


I will not describe for you how to solder, how to cut wires etc. If you don't know this probably you should buy the stuff from eBay I mentioned above :) I have included some "safety" tips below though, for critical steps.

What to do


First, cut the USB cable to a length that suits you. Think about how you will use it, if you want to keep the battery at the side of the synth or attach it to it in some way (adhesive velcro strips should work nicely for a very mobile approach).

Carefully strip the outer shell of the end of the cable that you just cut, to reveal the four inner wires/cores of the cable.

Now you need to strip the inner wires as well. If you are lucky like I was, they are correctly colored (red for +5 V, black for ground/-). To be sure you should check the voltage of the wires to find the two ones that delivers the current (the other two are signal wires). So, if you have a black and red one, strip those first and use the volt meter to check if they are the correct ones (it should say there is around 5 or -5 V, depending on how you measure it), when the plug is inserted into your USB-battery. Make sure none of the small stripped wires touch each other once the plug is inserted in the battery!

When you know what two wires deliver the current you must also know which is + and which is -. I do it like this: normally the volt meter has one red wire for + and a black for -. Make sure the wires are in the correct place in the volt meter. Then, when you get 5 V (not -5) when you measure the voltage of the USB wires, you know the + one is the one that the red volt meter wire is touching. Make a note of which wire it is.

Now that you have identified the two USB wires that carry the power, you need to solder them to the DC plug. Before you solder them, put on the outer "shell" of the plug on the cable first (always irritating to notice this afterwards). Make sure you solder the + wire such that it is connected to the outside of the DC plug and that the - wire is connected to the inside/middle. Also make sure the two wires to not touch. If you have a good volt meter you can either use the beep function, if it has one, or use the resistance/Ohm metering to make sure there is no connection between the plus and minus wires (when the cable is not connected in either end).

I tried to take a photo of my plug:


Here is the final cable:


Now, before you try it out, try to measure that there is indeed a connection between pin 1 and 4 and the inner and outer part of the plug, and that there is no connection where it should not be. When you have tried this, you can input the USB plug into your battery. If nothing smells bad or blows up, probably you did it right :) Now measure with your volt meter if there is 5 V between the inner and outer part of the DC plug. If it is, it is time to try it in the synth - yay!

For me, it looked like this, this evening:


Just above the synth you can see my USB-battery happily powering along - hurray! :)

Trivia


Before I actually built the final cable I did a lot of measuring of how much current the synth use when powered by the AC adapter. The specs says it should use 1000 mA but it turns out that I could not get it to use more than 0.7 A / 700 mA (for me, it used 0.64 A when turned on and idle and went up to 0.66 A for most of the included demo programs). This means we are probably quite safe since the USB-battery specs say it can deliver 1 A / 1000 mA (since the voltage is lower it HAS to be able to deliver more than 700 mA). When I measured I only had headphones attached to the synth.

The actual voltage of my AC adapter is 5.8 V.

Disclaimer


Since I'm no electronics expert I don't know how this solution will work in the long term, so I cannot make any promises of how stable and safe this hack is. But I feel it should be quite safe.


Update 2016-01-06


After trying the small battery out for two days it looks like I get around 2 hours of play using the small 2200 mAh battery. Quite okay in my view. You can buy bigger ones with 5000, 10000 or even 50000 mAh if you need. There are even solar powered ones if you want to be totally off the grid :)


Update 2016-01-17


Been using this hack for some weeks now and it works great. Today I even filed away the AC adapter, to be forgotten in a drawer... :) I also did something I planned from the beginning and attached the battery on the back using some Velcro tape:


Quite neat, and very portable. Being as small as it is, the synth is now very easy to move around the apartment. I just need to have a pair of headphones with me. I can remove the battery and charge it or I can simply plug in a normal micro USB charger to the battery where the synth happens to be right now. To conclude this update I'm very happy with this simple hack and I really feel that the lack of battery operation is not a problem anymore.

Update 2018-03-10


So, for those who has not read the comments below, I want to highlight here that this hack has some problems powering the JD-Xi when playing some analog tones. See comment below for more details.

Update 2020-07-07


For the benefits of others I want to share another solution that I found:

http://myvolts.com/product/46110/Power_Supply_and_Chargers/Ripcord_USB_to_5.7V_DC_power_cable_compatible_with_the_Roland_JD-Xi_Synth

If that works, it should be an almost ideal solution. I have tried doing my own such "cable" using both step up (boost) and step down (buck) converters, but I have not had much luck. I think the quality of the converters I have got hold of is not the best as the amount of current increases. In theory it should work though and I hope the makers of the cable I linked to above have made their homework and have a solution that works.

So, yeah...

Also see the discussion here:


2015-12-22

Evil Mode hack for a colorful mode line

Intro

After trying out Spacemacs for about a week (and failing - too much old configuration to "convert") I am trying out Evil Mode by itself. It goes forward, slowly, step by step.

One thing I have been a bit annoyed with was how the different states are visualized. Being a Evil/Vim newbie I want to see, clearly, in which state/mode I am in.

Today I decided to do something about it and here is how my Emacs looks now:

Normal state


Insert state


Emacs state


How it was done

I could not find any good entry points for customizing the mode line with respect to the Evil Mode states, but I found the function (evil-generate-mode-line-tag) that generates the part of the mode line that comes from Evil Mode. I simply made a copy of it and changed it to add also a face attribute to the mode line, and let the face be different depending on the mode.

The code

Copy the code below and save it in a file called my-evil-hacks.el.

After this you need to make sure to load this file after you have loaded Evil mode for the first time. One way to achieve this is to put the following snippet in your .emacs or init.el file:
(with-eval-after-load "evil"
  (load "my-evil-hacks"))
Enjoy!

2015-08-21

Something I should have done a long time ago...

This is something I should have done a long time ago, to make window creation and manipulation easier in Emacs:

(global-set-key (kbd "C-1") 'delete-other-windows)
(global-set-key (kbd "C-2") 'split-window-below)
(global-set-key (kbd "C-3") 'split-window-right)
(global-set-key (kbd "C-0") 'delete-window)

It gives the window manipulating commands I use the most nicer key bindings; just by keeping the Ctrl key pressed and typing away (crazily) on the keys 2 and 3 you can create master pieces of window configurations :)

I could do this since I realized I seldom or never use these shortcuts to enter a numeric argument. If I need to, I can use a slightly longer key sequence like C-u 1 or M-1 which I have kept (for now...).

Perhaps this post will inspire someone else to do the same.

2015-07-18

Evaluating elisp expressions from a web page with a custom URI scheme

Intro


Very boring title, eh? :) Well, this is kinda neat...

Some of you might already know that you can install a custom URI scheme handler in most operating system. Today I did an experiment with that together with Emacs and it turned out quite nicely. I did
this in Windows but it should work in GNU/Linux and OS X as well.


So, what is an URI scheme?


Briefly explained, the URI scheme is the "http" part in URLs that we all use everyday. Other examples are "ftp" and "file". The most common ones are handled by your web browser but you can also have another program on your computer handle a certain URI scheme. You can register your own URI schemes as well and in this post we will experiment with a new URI scheme that we name "emacs", for evaluating expressions/executing commands in Emacs.


A warning


If you decide to do this, you should be very careful, since it could be a big security risk. Either you let the warning from your web browser always be there to warn you (it can be supressed easily, for a
better user experience) or you register a secret URI scheme (like "myverysecretemacsurischeme") that no one else knows about. Otherwise, bad people can do very nasty things with your computer...

Okay, with that aside, let's go!


Step 1 - Registering a new URI scheme


In Windows you register a new URI scheme in the Windows registry (where else...). Basically you have to create the following key/folder structure under the HKEY_CLASSES_ROOT hive:

<name of URI scheme handler>
  shell
    open
      command

Lastly, the "command" key's Default value (right hand side) should have the path to the program handling the request, and %1 should be there to, to send in the parameters from the URL to the program.

If you dare, you can save the following snippet of text as something.reg on your PC, and double click that file. It will add an URI scheme handler for the "emacs" scheme for you. You have to change the path to the program afterwards:

Windows Registry Editor Version 5.00
[HKEY_CLASSES_ROOT\emacs]"URL Protocol"=""
[HKEY_CLASSES_ROOT\emacs\shell]
[HKEY_CLASSES_ROOT\emacs\shell\open]
[HKEY_CLASSES_ROOT\emacs\shell\open\command]@="f:\\Dropbox\\home\\dat\\doc\\src\\bat\\emacsschemehandler.cmd \"%1\""


Step 2 - A script to handle the new URI scheme


To handle the new URI scheme I created a small cmd file that processes the arguments a bit and then starts emacsclient. It looks like this:

REM f:\Dropbox\home\dat\doc\src\bat\emacsschemehandler.cmd

@echo off

REM Pick up all arguments to the script (in case there are spaces)
set emacscommand=%*

REM Stript away the part we don't need...
set emacscommand=%emacscommand:emacs:=%

REM Start emacsclient
f:\Dropbox\home\pgm\emacs-24.3\bin\emacsclient -n -e %emacscommand%

Save the script above as a .cmd file on your computer and update the registry to reflect the path to the .cmd file on your system. Also update the path to where your emacsclient is.

The script is, as can be seen, very simple and basically it just trims off part of the argument from the web browser that we do not need and use the rest as an argument to emacsclient. If you decide to use
another name than "emacs" for your own experiments, make sure to update "emacs:" above to whatever name you picked (plus a colon).


Step 3 - Testing it from a web page


Now you only need a web page with some links to try it out. I have provided a couple of links below that you can try right now, if you decided to use the "emacs" URI scheme, that is. The code for the links looks like this (if you do not trust me, view the source code for this blog post):
<a href='emacs:(message """Hello, Emacs!""")'>Hello, Emacs!</a> <a href="emacs:(calendar)">Open Calendar</a><a href="emacs:(info-emacs-manual)">Open the Emacs manual</a>
Here are the links:

Hello, Emacs!
Open Calendar
Open the Emacs manual

The triple double quotes in the first example are needed in order to send strings from the cmd file to emacsclient. That is why I used single quotes around the href value, which I normally don't like.

Now, what do you wait for, try it! Go go go! :)


So, what can this be used for?


Well, not sure. For me it was mostly a nice experiment, but I can see some uses for people who work a lot in Emacs but also a lot in a web browser and where they need some kind of interaction between
those. Perhaps something nice can be done together with Org mode and documentation of code, where you view the documentation in a browser but let the user try out code in Emacs, or just jump to a particular section in the Org mode document there. I guess the possibilities are endless, as with most things Emacs... :)

Hope you enjoyed it!

C'ya!

2014-10-28

Cake. Can have. Eat too.

A while ago, a friend of mine shared this informative article about why Atom (a new text editor by the Github team, it seems) cannot replace Vim. The author talks about the very useful composability property of Vi(m) and ends his article with this (do read the complete article though, especially if you are quite new to Vi(m)):
A new, shiny, modern editor could one-up Vim by fixing some (or hopefully all) of these issues. But before an editor can replace Vim, it needs to learn everything that 1976 has to teach — not just the lesson of Emacs, but also the lesson of vi.
Well, it might not be very "shiny", and "modern" is, I guess, very subjective, but there is already an editor that both have awesome extensibility and, optionally, strict modal behaviour with a "command" mode.

Which editor it is? Emacs, of course. Just fire up viper-mode, or pick one of the more modern Vi(m) emulation packages like Evil (here is a list of different emulation modes for Emacs) and you can now have your cake and eat it too.

Mmm. Cake.

Keyboard activated favorites menu using "simple menu items"

Some time back I wanted to create a keyboard activated menu with one-key access to some favorite commands that I did not want to give one-key bindings in the global keymap and for which I do not want to type the names on the M-x prompt. I was going to write my own command to read the key for the favorite command. However, it turns out Emacs already had more or less what I wanted in the form of simple menu items.

I chose to use the "apps" key (on keyboards with two Windows keys, it's the key to the right of the right Windows key, with a little menu symbol on it) since I did not use that for anything in Emacs.

Here is how to try this little hack out (FYI the key/command combinations below are just examples and not the actual keys and commands I wanted to use):

(defvar my-favorties-map (make-sparse-keymap "Favorites"))

(define-key global-map (kbd "<apps>") my-favorties-map)

(define-key my-favorties-map (kbd "f") 
  (cons "Find file"
        'find-file))

(define-key my-favorties-map (kbd "s")
  (cons "Save current buffer"
        'save-buffer))

(define-key my-favorties-map (kbd "i")
  (cons "Kill buffer"
        'kill-buffer))

After evaluating the above, when typing the "apps" key, the following "menu" will be displayed in the echo minibuffer:

 Favorites: i = Kill buffer, Save current buffer, Find file

It does what I want, although it is a little bit peculiar in how it decides for what bindings it will show X = Command for, and not. Seems that if the name of the menu item/command begins with the same letter/key that is bound to the command, it will not show it.

So, there it is, an instant little text based menu for executing favorite commands.

Enjoy!